Google+ Tips
Google giving another try to control the boom of facebook in specific and the other social media network in general, lets analyse Google Plus a Google new social network web app for people around the globe.
Google+ is on its way to charm people and many of the Facebook users are already making their minds to take a shift, so it is just matter of time, but again these are somehow pre-mature thoughts, so we will have to wait and see the impact.
Frankly speaking, we had to spend sizable amount of time to get familiar with Google+, we thought of saving you from the effort. So let’s start with Google+ and here you will get some basic useful tips if you are just joining Google+ or are still wondering what to do here?
Getting Started
There has been much hype about how and from where to get Google+ invitations. People started writing tutorials on how to invite someone on Google+, but Google has resolved the issue now and you do not need to end up pasting your email address here and there to ask for an invite.
Registrations on Google+ are now open and you can sign up without any invite. Simply visit http://google.com/+/ and register yourself.
Welcome to Google+
If you have ever used any of Google’s services (Gmail, Google Profile, Blogger, etc.), then there are chances that Google+will detect more than 50 percent of your bio – to fill your profile. Don’t worry, your privacy settings will not be disturbed. For instance, you can link your Picasa account with Google+ while maintaining the same privacy settings as they were with your Picasa account.
So it’s time now to upload your profile picture and write something about you.
Build Your Circles
Next thing that you should do is, build up your circles and invite others. But to know what really circles are, read below:
Circles are different set of groups, or lists with different permissions. You can add your contacts in these circles to make sure that you don’t share your information with those who shouldn’t see them.
You will get updates from contacts that you have added in your circle. Just like twitter, you start getting updates from those whom you follow
Contacts in your circle will not get your updates, though they will be invited – but they can deny any incoming requests.
By default Google offers following circles to you, of course you can create more with ease
Friends
Family
Acquaintances
Following
You can simply mouse over them to read what kind of circle it is and sharing settings.
Adding Contacts to Circles:
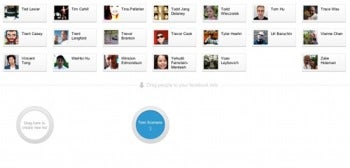
Click circle button (right on top middle – or where the red arrow is in above image)
Go to "Find and Invite" tab
Here you will be suggested with contacts that you may want to add in your circles, drag and drop them in below circles… simple as that
Note: Suggestions will be those contacts that you recently interacted with on Gmail
Want to add someone who is not in suggestions: There’s a button “Add a new Person”, click on it – type email address and you are done.
So you are almost done with basic settings and this is the time to go out and say Here I am!
Posts and Stream
You must be familiar with wall posts on Facebook, here Google calls it stream. And for me, the most loveable feature of Google+ is to get stream from specific circle.
- Select stream from any of your circle and updates from only those will be shown from the circle
- You can Share a post from your stream, comment on it +1 it (kind of liking a post)
- You can post an update, using the box given on top of stream – exactly like facebook has;
- Post any thing you feel like, you can add videos, pictures, links and so on
- You can edit posts later on, delete them, mute them and so on
- You can select circles or contacts that you want your post to be shared with.
- You can disable resharing and/or commenting

Hangouts
Hangouts is the coolest feature of Google Plus, it will let you start a video conversation with as many friends of yours as you like.
Simply click the “Hangout” button available on right sidebar or visit this link: plus.google.com/hangouts
You’ll be taken to a "green room" where you can select circles or individuals to add in your room (video chat).
Sparks = Interests and Likes
Visit the Sparks menu from left sidebar and you will find featured interests. Don’t worry, you are not bound to like them. Search your interests and while adding them, Google+ will give you content suggestions that you can share on your wall, stream in fact.
Once again Google+ allows you here to set which circles you want to share with and it works the same way as described for the post.
Turning Off Email Alerts
By default, Google+ will email you for every post, comment, +1 or anything that happens and is related to you.
This may irritate you – so simply visit Google+ settings from the Options menu which you can find at the extreme right of black bar – codenamed the “Sandbar”, you must have noticed it appearing from few days.
Labels: Google, Google +, Google Inc, Google Plus
posted by Naveed Babar [ با بر ] @ 3:02 PM
0 Comments
![]()
![]()
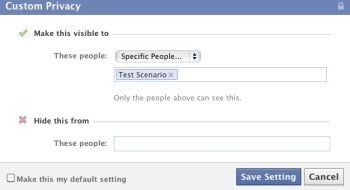 The other way to manage your friend lists is to click on "Account" in the upper right corner of your Facebook home page and select "Privacy Settings." Then click on "Customize settings" and in the next window you can select a variety of share options for things such as your wall posts, check ins, photos, email address and so on. You manage these settings pretty much the same way as a wall post. Just click on the drop-down menu, select "Customize" and in the next window decide on the people you want to make this content visible to and the people you want to hide it from.
